Copyright © 2015 Dominik Rueß
Legal Notices
This article is part of Scanned Image Extractor. Scanned Image Extractor is free software: you can redistribute it and/or modify it under the terms of the GNU General Public License as published by the Free Software Foundation, either version 3 of the License, or (at your option) any later version.
Scanned Image Extractor is distributed in the hope that it will be useful, but WITHOUT ANY WARRANTY; without even the implied warranty of MERCHANTABILITY or FITNESS FOR A PARTICULAR PURPOSE. See the GNU General Public License for more details.
In Section 6, “GNU General Public License” you can find a link to the license, or go directly to: http://www.gnu.org/licenses/
Table of Contents
This software app is open source. This means I was not able to invest a lot of time and money into buying and testing different systems/platforms etc. The advantage of open source being completely free and open (as compared to commercial software, freeware or shareware) is usually not always completely free - the user may help the developers by sending them errors or improvement suggestions. Lastly, a note: please respect the GPL: If you use (parts of) this software in your own project, publish the complete source code of your own project, as well.
I developed this software app for different platforms (e.g. Windows, Ubuntu, Fedora). However, I can only develop for platforms which I own myself. If you think an important platform is missing, send me a suggestion. I would love to also deploy this software for Mac OS X, too. I just don't own a Mac. If you're interested, consider donating to this project and I'll hopefully soon be able to buy a Mac (Section 5.2, “Donate to the Author”) and adapt and permanently support this software for it.
Always backup your files, also before using Scanned Image Extractor!!!
Note
The pure process of scanning pictures or albums is very time comsuming. Keep a copy of unedited original scans in a separate location.

Scanned Image Extractor is a tool for efficiently extracting rectangular photographs from album or (multiple) photograph scans. It is semi-automated, hence it tries to suggest recognized photographs but you have to verify, delete bad suggestions and possibly add missing photographs manually. For a list of features, refer to Section 3.1, “Features of Scanned Image Extractor”.
Scanned Image Extractor comes with an interesting list of features. If you're not sure how to make use of these features, you may want to refer to Section 4, “How to:”. With Scanned Image Extractor, you can:
efficiently extract one or more photographs per scanner image.
work on 16bit input images and have 16bit output images (useful e.g. for Gimp 2.9+ or Lightroom users).
have detections presented from automated photograph detection. If these detections are wrong, correct, delete or add them, manually.
constrain aspect ratios of output photographs
use keyboard shortcuts for an even more efficient work flow
Go to sourceforge and download from there: sourceforge.net/p/scannedimageextractor/ -> Files. Make sure you select the current version and an appropriate file for your operating system (i.e. windows installer for 32/64 bit windows).
Go to sourceforge and post your issue there: sourceforge.net/p/scannedimageextractor/ -> Tickets
Every Photo-Album looks different. Whenever your type of album is difficult send me a couple of example scans (full resolution) to scannerextract at dominik-ruess.de. I will not use these for anything else than improving this software. However, please also note there are some hints on how to properly scan the photographs in Section 4.3, “How to use Scanned Image Extractor” and Section 4.4, “Tips and Tricks for using Scanned Image Extractor”.
Download the latest file for your operation system from Scanned Image Extractor Files. If your operation system is 64bit, I reccommend you choose the respective 64bit version of Scanned Imaged Extractor.
The binary installation package is self-explanatory. Download and execute it (download file ending on win32.exe or win64.exe). Tested with Windows 7 (64bit).
For Debian-like systems (tested with Ubuntu) download the respective .DEB files.
Install the pre-requisites:
           sudo apt-get install libqt5core5a libqt5network5
                     libqt5gui5 libqt5svg5 libqt5widgets5 liblbfgs0
                     libopencv-core2.4 libopencv-highgui2.4
                     libopencv-imgproc2.4
.
Now install Scanned Imaged Extractor with
sudo dpkg -i scannerExtract-x.y.z.deb.
Start the program with scannedImagedExtractor.
For RPM-based systems (tested with Fedora) install the following pre-requisites:
sudo dnf install opencv-core  qt5-qtsvg
          qt5-qtbase liblbfgs
                     opencv
.
Now install Scanned Imaged Extractor with
rpm --install -p scannerExtract-x.y.z.rpm
Start the program with scannedImagedExtractor.
Tested with Ubuntu 14.04, 15.04 and Fedora 22-3 (for all with both 32, and 64bit).
You will need cmake and the third-party modules OpenCV (version 2.4 or 3), liblbfgs and Qt5.
If you use version 2 of OpenCV, then you will need to add "-DOPENCV2=1" to the cmake command line.
If, for example you want to build in ubuntu, do:
        sudo apt-get install liblbfgs-dev libopencv-dev libqt5svg5-dev
             qttools5-dev-tools qttools5-dev qtbase5-dev cmake
.
Now build Scanned Image Extractor:
                mkdir build

                cd build

                cmake path/to/scannerExtract-X.Y.Z/scannerExtract/ -DCMAKE_BUILD_TYPE=release -DOPENCV2=1

                make

                (make install)
This section roughly explains how to use Scanned Image Extractor as part of a tool chain:
Scan an album page with at least 300dpi (however, especially for older photographs, 600dpi should be enough). As document type, choose picture/photograph. The complete scanning process of all albums/album pages will cost you most of the time. So to improve the efficiency here, refer to the following notes. Also make sure you have a look at Section 4.4, “Tips and Tricks for using Scanned Image Extractor”.
Note
Do not use the preview system of the scanner, it will only cost a lot of time. Just scan the complete scanning area. Only use it to get used to how the result looks like
Note
Do test your process before you start scanning all of your albums (i.e. follow this guide for some 2-3 album pages and test if everything's like you want it to be)
Note
If you have good quality photographs and want to post-process the images with a 16-bit aware tool (Gimp 2.9+, Lightroom, ...), then use 16bit scanning.
Use Scanned Image Extractor to extract the photographs of the scanned images (see Section 4.3, “How to use Scanned Image Extractor”).
Organize your photographs on the file level. E.g. create folders and rename the files appropriately. Also copy comments to the filename, which people have next to their album images, quite often. A tool like my pivot - photo, image and video organization tool can help you here.
Organize your photographs on the (meta) data level. Add tags to your images, post-process them by adapting colors etc. Use a free open source tool like digiKam or a commercial tool like Lightroom for this.
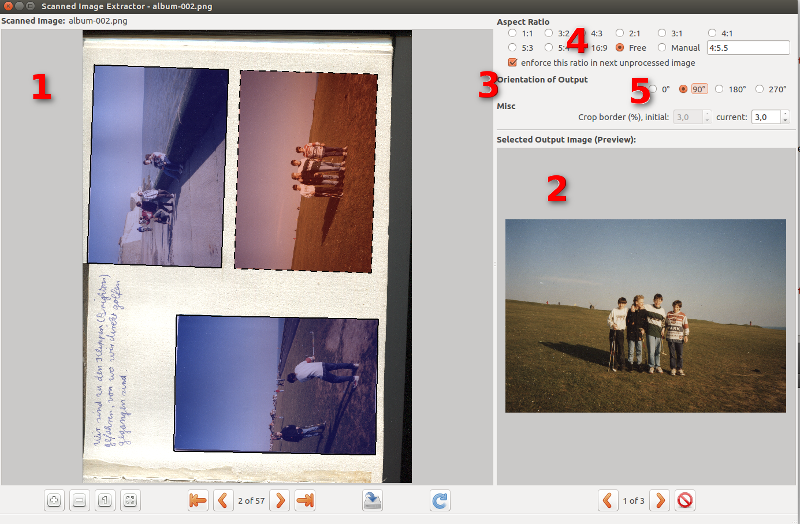
The user interface of Scanned Image Extractor is not very sophisticated. It consists of three main areas, one displaying the scanned image (1), one for the preview of the current photograph (2) and lastly, one area for the extraction settings (3), most importantly for the aspect ratio (4) and orientation (5) control. Refer to Figure 1, “Scanned Image Extractor Screenshot” for a screenshot.
Start by loading a scanner image (File menu). If you want to process all, just choose the first scanned image in your directory. Now, after some computation, the detected photographs are suggested as blue boxes in the input image. These blue boxes will be extracted to a specified directory (see settings) as digital photograph. When your done with the current scanned image, proceed to the next one by clicking on the respective button. The output images of the last image will then be processed automatically, there's no need to press the "save" button every time.
Press the keys 1-9 and 0 to enforce a certain aspect ratio for the current target.
Press the keys "a", "s", "d" or "f" for fastly changing the orientation of the current target selection.
If you dislike the current detection(s) you can manipulate, delete or manually add them yourself. Go to any edge or corner to change the size of the selected target. If you press CTRL while dragging, this will be symmetric. If you press SHIFT and then drag a corner of the selected rectangle, you can rotate it by dragging. For adding a new selection, deselect all (click somewhere empty) and click at a corner of the photograph. Keep the mouse pressed and drag the red line to another corner and release the mouse. Now you have a new rectangle which you can resize by moving your mouse. Click to have a new target rectangle.
Note
Most albums have a page format which doesn't completely fit on the scanner. Scan one page with two iterations: align the top-left page to your scanner and then turn the page upside-down and align the former bottom-right (now top-left) corner with your scanner. This will ensure - in most cases - that every photograph is contained completely in at least one of the two scans.
Note
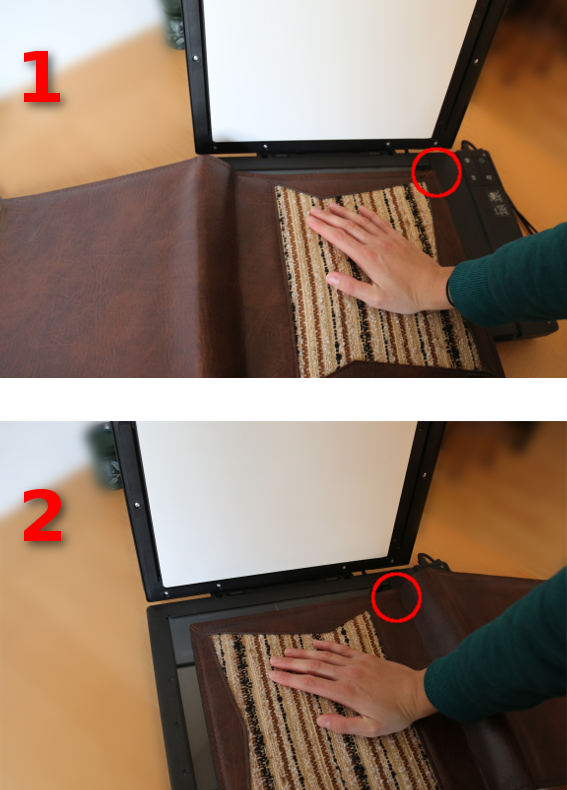
I DO NOT TAKE ANY RESPONSIBILITY if you damage your scanner, so do this on yor own responsibility: The results look a lot better, if you use one hand to press the album onto the scanner. It reduces bulges in your scans. (Das ist in Figure 2, “Scanned Image Extractor Album Placement” angedeutet)
Note
If you want to scan multiple single photographs (WITHOUT album), do not place them right at the scanner edge. Leave some space to the scanner boundaries and to the other photographs. This will make the automated recognition process easier and reduce the risk of the photograph overlapping the boundary when closing the lid. There more space in between photographs and to the boundary, the better.

Note
Always try to constrain the aspect ratio with as few different aspect ratios as possible. Otherwise skipping through the resulting image is not a nice experience.
If certain widgets of the application are not quite clear, hover the mouse over it. Information about it will be displayed in a hint and/or in the status bar of the application.
Additionally, sometimes it might be helpful to enter the help mode. This is the button with the question mark. Click it, then click the element which you want to have help for.
If you like the software, if you wish to say thank you or if wish to support further development of the software, consider making a donation to the author (no tax deduction). This can be done directly via the projects's sourceforge donation page, https://sourceforge.net/p/scannedimageextractor/donate, or by writing an email to donate at dominik-ruess.de. Thank you.
You can find version 3 of the GNU GPL here: http://www.gnu.org/licenses/gpl.html. A copy of the license is also contained in the program source code.